-
Yields: 1 large loaf
-
Prep Time: 30 minutes (plus 12-16 hours inactive rising time)
-
Cook Time: 45 minutes
-
Total Time: 13 – 17 hours
-
Skill Level: Beginner-Friendly
-
Recipe Intensity: Low (High patience required, low physical effort)
There is something truly magical about baking your own bread. The alchemy of transforming simple flour, water, and salt into a nourishing, delicious loaf is a timeless practice. This Sourdough No-Knead Garlic Bread recipe is our ultimate version—a perfect entry point for novice bakers and a reliable staple for seasoned sourdough enthusiasts.
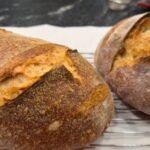
By leveraging the long, slow fermentation of a no-knead method, we develop incredible flavor and an open, holey crumb that is the hallmark of great artisan bread. The addition of roasted garlic paste, kneaded directly into the dough, ensures every single bite is infused with a sweet, mellow, and deeply savory garlic essence. The exterior bakes up to a shatteringly crisp, golden-brown crust, while the interior remains tender and moist.
Forget complicated folding techniques and strenuous kneading. This recipe is a lesson in patience, allowing time and natural fermentation to do the heavy lifting for you. The result is a show-stopping loaf that will fill your kitchen with an unforgettable aroma and elevate any meal, from a simple bowl of soup to an elegant dinner party spread.
Ingredients
For the Main Dough:
-
500g Bread Flour
-
350g Lukewarm Water (around 75°F / 24°C)
-
100g Active Sourdough Starter
-
10g Fine Sea Salt
-
Roasted Garlic Paste (from below)
-
Rice Flour, for dusting (optional, but recommended)
For the Roasted Garlic Paste:
-
1 large head of Garlic
-
1 tbsp Olive Oil
-
Pinch of Salt and Black Pepper
-
1 tbsp fresh Parsley, finely chopped (optional, for color)
For Topping (Optional):
-
Additional Olive Oil for drizzling
-
Flaky Sea Salt (like Maldon)
Equipment
-
Large Mixing Bowl
-
Plastic Wrap or a damp kitchen towel
-
Dutch Oven with a lid (essential for the perfect crust)
-
Parchment Paper
-
Bench Scraper
-
Proofing Basket (Banneton) or a medium-sized bowl lined with a floured tea towel
Instructions
Part 1: The Roasted Garlic Paste (Can be done ahead of time)
-
Prepare the Garlic: Preheat your oven to 400°F (200°C). Slice the top off the entire head of garlic to expose the cloves. Place it on a piece of foil, drizzle with olive oil, and season with a pinch of salt and pepper.
-
Roast: Wrap the garlic tightly in the foil and roast for 35-40 minutes, or until the cloves are soft, golden, and easily squeezed out.
-
Create the Paste: Allow the garlic to cool until you can handle it. Squeeze the soft, caramelized cloves into a small bowl. Mash them with a fork into a smooth paste. Stir in the chopped parsley (if using). Set aside to cool completely.
Part 2: Mixing & The Long Ferment (Evening, Day 1)
-
Autolyse: In your large mixing bowl, whisk together the bread flour and lukewarm water until no dry bits remain. The dough will be shaggy. Cover the bowl and let it rest for 30 minutes. This process, called autolysis, helps with gluten development and hydration.
-
Incorporate Starter and Salt: Add the 100g of active, bubbly sourdough starter and the 10g of salt to the dough. Use wet hands to pinch and fold the dough over itself in the bowl until the starter and salt are fully incorporated.
-
Add the Garlic Paste: Spread the cooled roasted garlic paste over the top of the dough. Again, with wet hands, gently fold and pinch the dough until the garlic is evenly distributed. It will be a sticky, wet dough—this is perfect.
-
Bulk Fermentation: Cover the bowl tightly with plastic wrap or a damp cloth. Let it rest at room temperature (68-72°F or 20-22°C is ideal) for 12-16 hours. The dough is ready when it has doubled in size, is covered with small bubbles on the surface, and has a slightly domed top.
Part 3: Shaping & Second Proof (Morning, Day 2)
-
Prepare for Shaping: Generously flour a work surface. Gently scrape the dough out of the bowl onto the floured surface. It will be loose and bubbly—handle it gently to preserve the air pockets.
-
Shape: Using your bench scraper and floured hands, gently fold the dough over itself from all four sides to create a tight, round boule (ball). The goal is to create surface tension on the outside of the loaf.
-
Proof: Heavily dust your proofing basket (banneton) or a towel-lined bowl with a 50/50 mix of rice flour and all-purpose flour. Place the dough ball seam-side up into the basket. Cover it loosely with a plastic bag or a towel and let it proof for 1-2 hours at room temperature.
Part 4: Baking
-
Preheat: At least 30 minutes before baking, place your Dutch oven with its lid on inside your oven and preheat to 475°F (245°C).
-
Score the Dough: Once the oven is preheated, carefully remove the hot Dutch oven. Turn your proofed dough out onto a sheet of parchment paper. The “seam side” is now the bottom, and the smooth, rounded side is the top. Using a sharp lame, razor blade, or very sharp knife, make one swift, confident slash about ½-inch deep across the top of the loaf. This allows the steam to escape and the bread to expand beautifully (a process called “oven spring”).
-
Bake Covered: Using the parchment paper as a sling, carefully lower the dough into the preheated Dutch oven. Put the lid back on and place it in the oven. Bake for 30 minutes.
-
Bake Uncovered: After 30 minutes, remove the lid. The bread will be pale but well-risen. Reduce the oven temperature to 450°F (230°C) and continue baking uncovered for another 15-20 minutes, or until the crust is a deep, golden brown and sounds hollow when tapped on the bottom.
-
Cool: Transfer the loaf to a wire cooling rack. This is the hardest but most crucial step: let the bread cool completely for at least 2-3 hours before slicing. Cutting into it too early will result in a gummy crumb, as the bread is still cooking internally.
Nutrition Information
-
Serving Size: 1 Slice (approx. 1/12th of loaf)
-
Calories: 180
-
Total Fat: 1g
-
Saturated Fat: 0g
-
Cholesterol: 0mg
-
Sodium: 325mg
-
Total Carbohydrates: 36g
-
Dietary Fiber: 1.5g
-
Sugars: 0.5g
-
Protein: 6g
Note: Nutritional information is an estimate and may vary based on specific ingredients used and their exact quantities.

Hayyat is a talented content writer and digital marketer with expertise in SEO, social media management, and online marketing. She excels at creating impactful, data-driven content to help businesses connect with their target audience and achieve measurable outcomes.


